Monday, November 28, 2011

Decorating the Christmas Tree - Step One

Last year I did not put up a Christmas tree.  The stress of 2010 had worn me out and I couldn't face the effort of putting up holiday decorations, let alone take them down at the end of the season.  It was just all too daunting!

2011 has been as stressful as 2010, but I decided to once again have a tree for the holidays.  Usually I wait until the week before Christmas to 'deck the halls', but this year I started much earlier.  Yesterday I bought the tree!  And I'm so glad I did.  For the first time in my married life, there is no pressure to get the tree done.   I have over three weeks to finish.  Love it!

Decorating the Tree - Step One

Those of you who have an artificial tree, can skip this post.  And for the sheer ease of decorating and storage, I highly recommend an artificial tree.  I really considered going 'fake' this year.  But the tree I liked was just too expensive.  

I don't have a preference for live trees over artificial trees.  Both are lovely and also have pros and cons.  But let me know what you think.

Getting back to decorating the tree.  For a live tree, the first step is pruning and shaping the branches to make room for lighting and ornaments.  Many people skip this step, but it only takes a few minutes and is worth the effort. 

 Shaping a Live Christmas
  • Clip the tips of branches that 'stick out too far' from the desired triangle shape.
  • Create room for ornaments by pruning branches near the trunk that overlap. 
  • Trim the tip of the tree crown to a height that will fit your 'tree topper'. For trees that have two or more tips at the crown, prune until only one tip remains. 
 Shaping the tree. 

 Checking my work.
Making adjustments.

 Branches pruned from the tree.
The final shape. 

Next post, Decorating the Tree - Step Two, lighting.

Before I go, look at the gorgeous table my sister set for Thanksgiving!


And the turkey, stuffing, mashed potatoes, green beans, salad, gravy, homemade rolls and homemade pies were delicious!

Genevieve

Wednesday, November 23, 2011

Quick Thanksgiving Appetizer

Tomorrow morning I'm driving to Iowa and spending Thanksgiving with my sister and her family.  She is doing all the cooking and all I have to do is show up.  How great is that!

Before I leave, here is a great quick appetizer I tried tonight after hearing about it on NPR. It only takes a few minutes and is really good. 

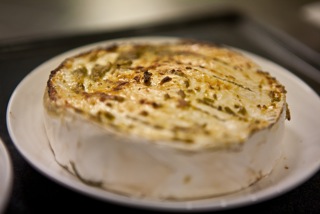
Baked Brie with Honey and Thyme

Cut the top off a round of brie.  Any generic store brand will work.


Place the brie in a microwaveable serving container and drizzle the top with 2 to 3 tablespoons of honey.
Chop one tablespoon of fresh thyme and sprinkle on top of the honey.  Dried thyme also will work.
Microwave the brie on high until warm.  I found that 30 to 50 seconds in the microwave on worked well.  Baking in the oven at 350 degrees for 10 to 15 minutes should yield similar results.


Serve with crackers or crusty baguette slices.

Happy Thanksgiving!

Genevieve

Thursday, November 17, 2011

Staging A Smaller House For Sale

A big thank you to everybody who left comments on 'The Chair Project' post!  I so appreciate your thoughtful comments and kind words.  June and Laney, I always look forward to your notes and pep talks.  And my two favorite gals from Iowa, Judy and Kelley, I'm so glad you keep stopping by.  Jill, Joyce and Stellans, your warm wishes for my family are so very much appreciated.  Thanks for taking the time to write!

Some of you know that over the past few weeks I have been decluttering and staging my mother-in-law's house for sale.  The first open house was held just last Sunday. 

Here are old photos showing the house before staging.  This is the entryway and living room.  Notice the green carpet and furniture placement. 

Again, notice the green carpet and clutter in the room.  Too much furniture and too many accessories.  And yes, that is me with my oldest as a baby.  The last two photos show the den and kitchen. 


Here is the house after staging.  I pulled up the carpet, with help from my husband Rick.  Eliminated most of the furniture and rearranged the rest.  All the living room and dining room furniture is over 40 years old, but a few new accessories (from my house) brought out the best in these old pieces and make for a terrific art deco look. 


Here is the kitchen staged for sale.  Keeping it simple was and clean was the goal.  I used only white and silver accessories that focused on the Italian coffee and espresso tradition.


The small den/study is right off the kitchen.  This is the same room as shown above in the photo with the pheasant.  The clutter and two oversized couches were removed to leave a light filled room with a modern feel.


In the bathroom, there was nothing to do but go 100% with the art deco theme.  And it worked!


In the master bedroom upstairs, I removed all but four pieces of furniture, the bed, night stands and chest of drawers.  I replaced the lighting with lucite lamps and black shades from Cost Plus.  The bedding is also new from TJ Maxx.  The modern clock is original to the house.

It's difficult to overstate how much furniture and clutter were in the upstairs bedrooms which were used almost exclusively as storage.  But after staging, the rooms looked terrific.  Here the second bedroom which was organized to look like a young boys room.  The Borsalino hat and hat box belonged to my father-in-law.  Again, the bedding is from TJ Maxx.


The third upstairs bedroom was staged as a nursery.  The gray castle was built by my son's great-grandfather.  The chairs are antiques from my house with fresh cushions.


 If you would like to see the complete listing click here.  Let me know what you think.  

Genevieve